Newsletter archive
State of Duplicate Annihilator – part 47
- Improvements to Duplicate Annihilator.
- AI in Photos Finder.
State of Duplicate Annihilator – part 46
- Duplicate Annihilator for Photos v9
- AI Classroom.
State of Duplicate Annihilator – part 45
- GPTEverything.
- AI coming to Duplicate Annihilator and Photos Finder.
State of Duplicate Annihilator – part 44
- Introducing Photos Clicker.
- Improvements to Photos Finder.
- Photos and People
State of Duplicate Annihilator – part 43
- Introducing Photos Finder.
- macOS 13 Ventura feature "Copy Subject" explained.
State of Duplicate Annihilator – part 42
- Photos 8 – how to set up a shared library
State of Duplicate Annihilator – part 41
- New features in Photos 8
State of Duplicate Annihilator – part 40
- Duplicate Annihilator for Photos v8 released
- How to search, filter, suggest and “facet” your search in Photos.
State of Duplicate Annihilator – part 39
- How to work with People/faces?
State of Duplicate Annihilator – part 38
- Metadata, what is it and how do I use and edit it?
State of Duplicate Annihilator – part 37
- Introducing Duplicate Annihilator 7.5.0 including fix for iCloud and missing files.
State of Duplicate Annihilator – part 36
- Introducing Duplicate Annihilator v7 including copy metadata from duplicates to originals.
- Smart albums for missing people no longer working
- Photos 7 and Live Text
State of Duplicate Annihilator – part 35
- Preserve folder and album structure as keywords
State of Duplicate Annihilator – part 34
State of Duplicate Annihilator – part 33
State of Duplicate Annihilator – part 32
State of Duplicate Annihilator – part 31
State of Duplicate Annihilator – part 30
State of Duplicate Annihilator – part 29
State of Duplicate Annihilator – part 28
State of Duplicate Annihilator – part 27
State of Duplicate Annihilator – part 26
State of Duplicate Annihilator – part 25
State of Duplicate Annihilator – part 24
State of Duplicate Annihilator – part 23
- Working with Duplicate Annihilator for Photos – part 3
State of Duplicate Annihilator – part 22
- Working with Duplicate Annihilator for Photos – part 2
State of Duplicate Annihilator – part 21
- macOS 10.5 Catalina, Photos 5 and Duplicate Annihilator v4
- Working with Duplicate Annihilator for Photos – part 1
State of Duplicate Annihilator – part 20
State of Duplicate Annihilator – part 19
State of Duplicate Annihilator – part 18
State of Duplicate Annihilator – part 17
State of Duplicate Annihilator – part 16
- Duplicate Annihilator – HEIC format support
- What is HEIC?
State of Duplicate Annihilator – part 15
State of Duplicate Annihilator – part 14
State of Duplicate Annihilator – part 13
State of Duplicate Annihilator – part 12
State of Duplicate Annihilator – part 11
State of Duplicate Annihilator – part 10
State of Duplicate Annihilator – part 9
State of Duplicate Annihilator – part 8
State of Duplicate Annihilator – part 7
State of Duplicate Annihilator – part 6
State of Duplicate Annihilator – part 5
State of Duplicate Annihilator – part 4
State of Duplicate Annihilator – part 3
State of Duplicate Annihilator – part 2
State of Duplicate Annihilator – part 1
Hi,
My name is Anders and I'm the CEO of Brattoo Propaganda Software. Finally, I’m back after a few weeks with Covid. In my last two newsletters I wrote about Duplicate Annihilator for Photos v7, and preserving metadata when deleting duplicates. With the evolution of digital photography, over the last twenty years, our photo libraries are growing quickly! This means that more precious memories are preserved, but it also means that it gets harder and harder to organize. Since Covid, with all its restrictions, seems to be staying with us for yet some time, many of us have found ourselves having more time to organize our digital life including our photos.
During my 1 on 1 Training Sessions I get more and more questions about organizing and adding meta data. I have written about those things before in several newsletters, but I think that it is time for a recapture.
Take care and stay safe.
What is metadata?
Many of us are familiar with the concept of metadata, but I know that some are not so let’s first talk about what metadata really is. Metadata is commonly described as “data about data”. In the case of photos it is the extra information. This extra information is very valuable! It includes things such as when the photo was taken, where it was taken and what is in the photo (such as peoples names, a description of an event and so on and so on). Now we all know what metadata is, let’s dive into it.
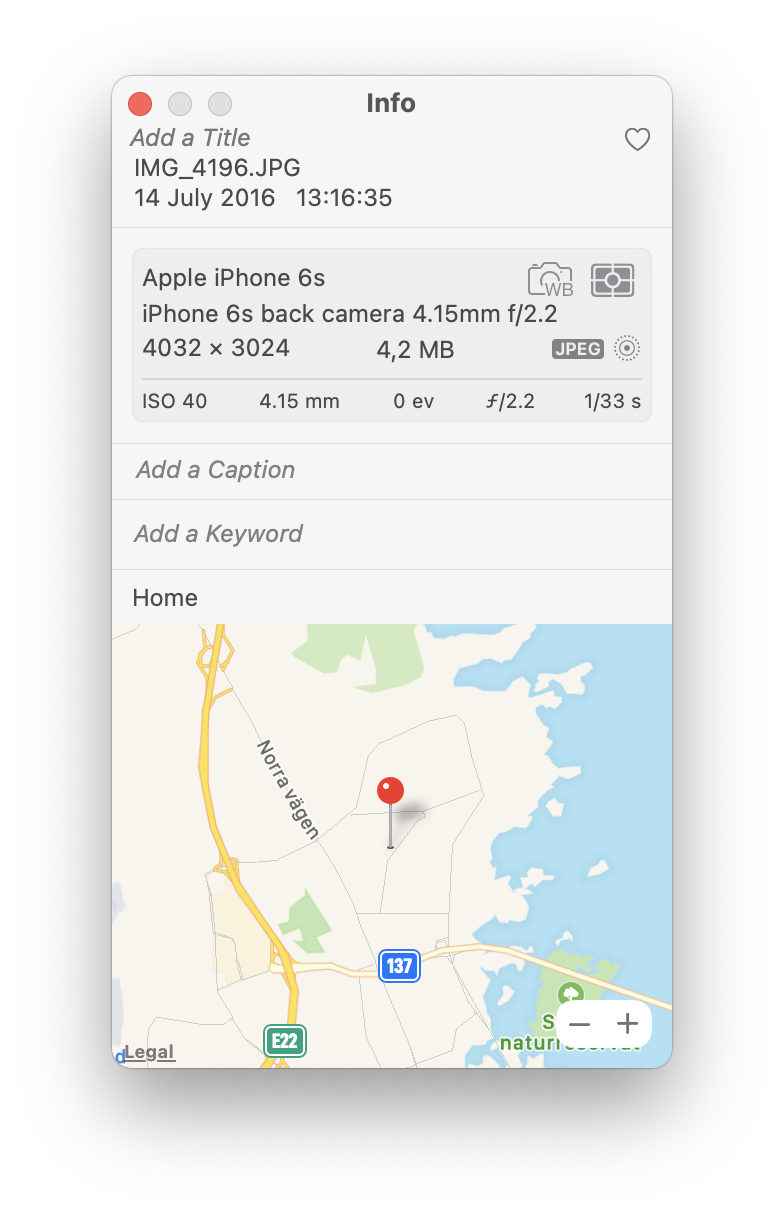
The Info window
The Info window is where we find all the metadata of our photos. In the Photos application there are three ways to open the Info window, either from the menu Window→Info or with the key combination Command+I or by clicking on the circle icon with the letter “i” at the top right corner of the Photos application. It looks something like this:
The Title
At the top we have the Title field. We can’t rename photos in Photos but we can add titles. The Title is especially useful when browsing your photos. When you browse your photos by default there is no information about the photos. By enabling “Titles” (menu View→Metadata→Titles) the filenames are shown under each photo in the Photos browser.
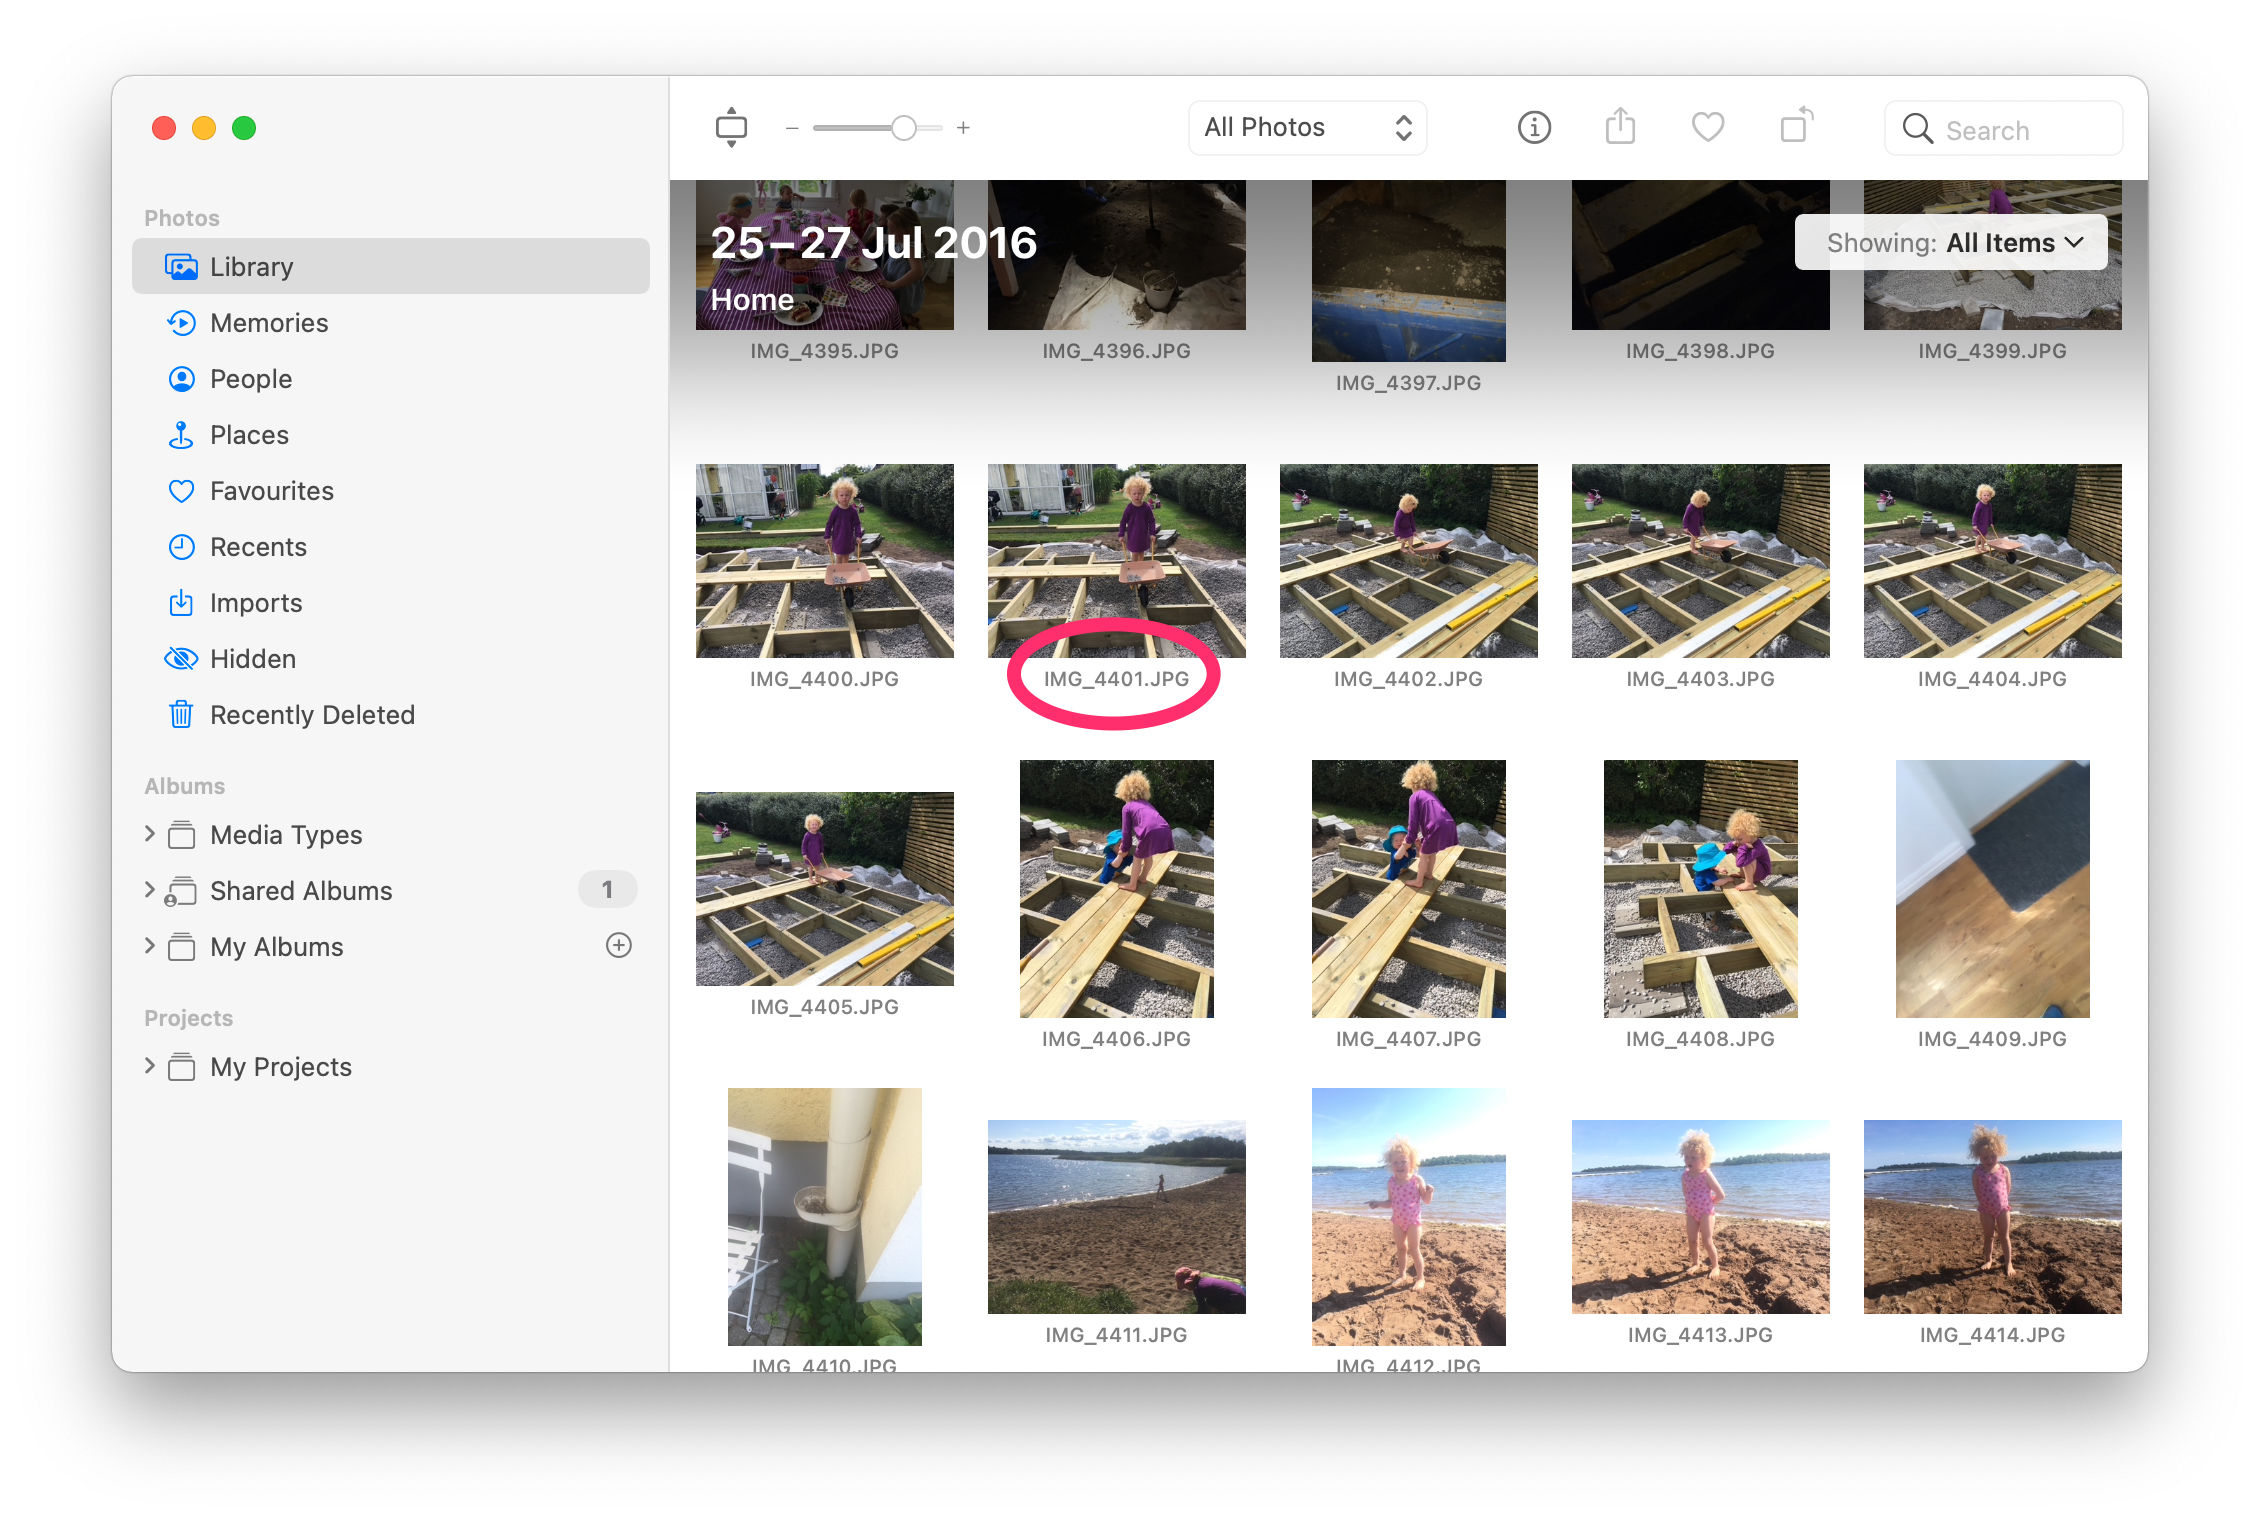
So as you can see, when there are no Titles assigned it shows the filenames. From the Info window you can now add a Title, or you can click on the filename in the Photos browser and add a Title directly from there.
In the Photos browser Titles are black and filenames are grey, enabling you to see that the Title is set. Titles can be useful for other reasons as well. In Photos albums, photos can be sorted by photo date but they can also be sorted by Title. You’ll find this is in the menu, View→Sort→Keep Sorted By Title.
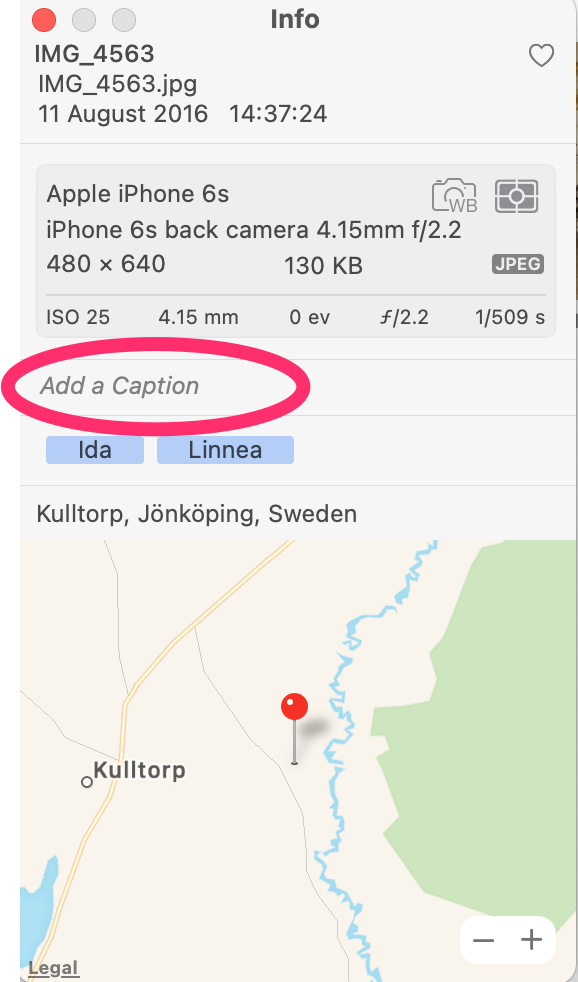
The Caption
Over the years there have been many names of this field depending on things such as version and localization. The name has varied between Comments, Description and Caption (there may have been even more). This field is where you put more descriptive text about the photo.
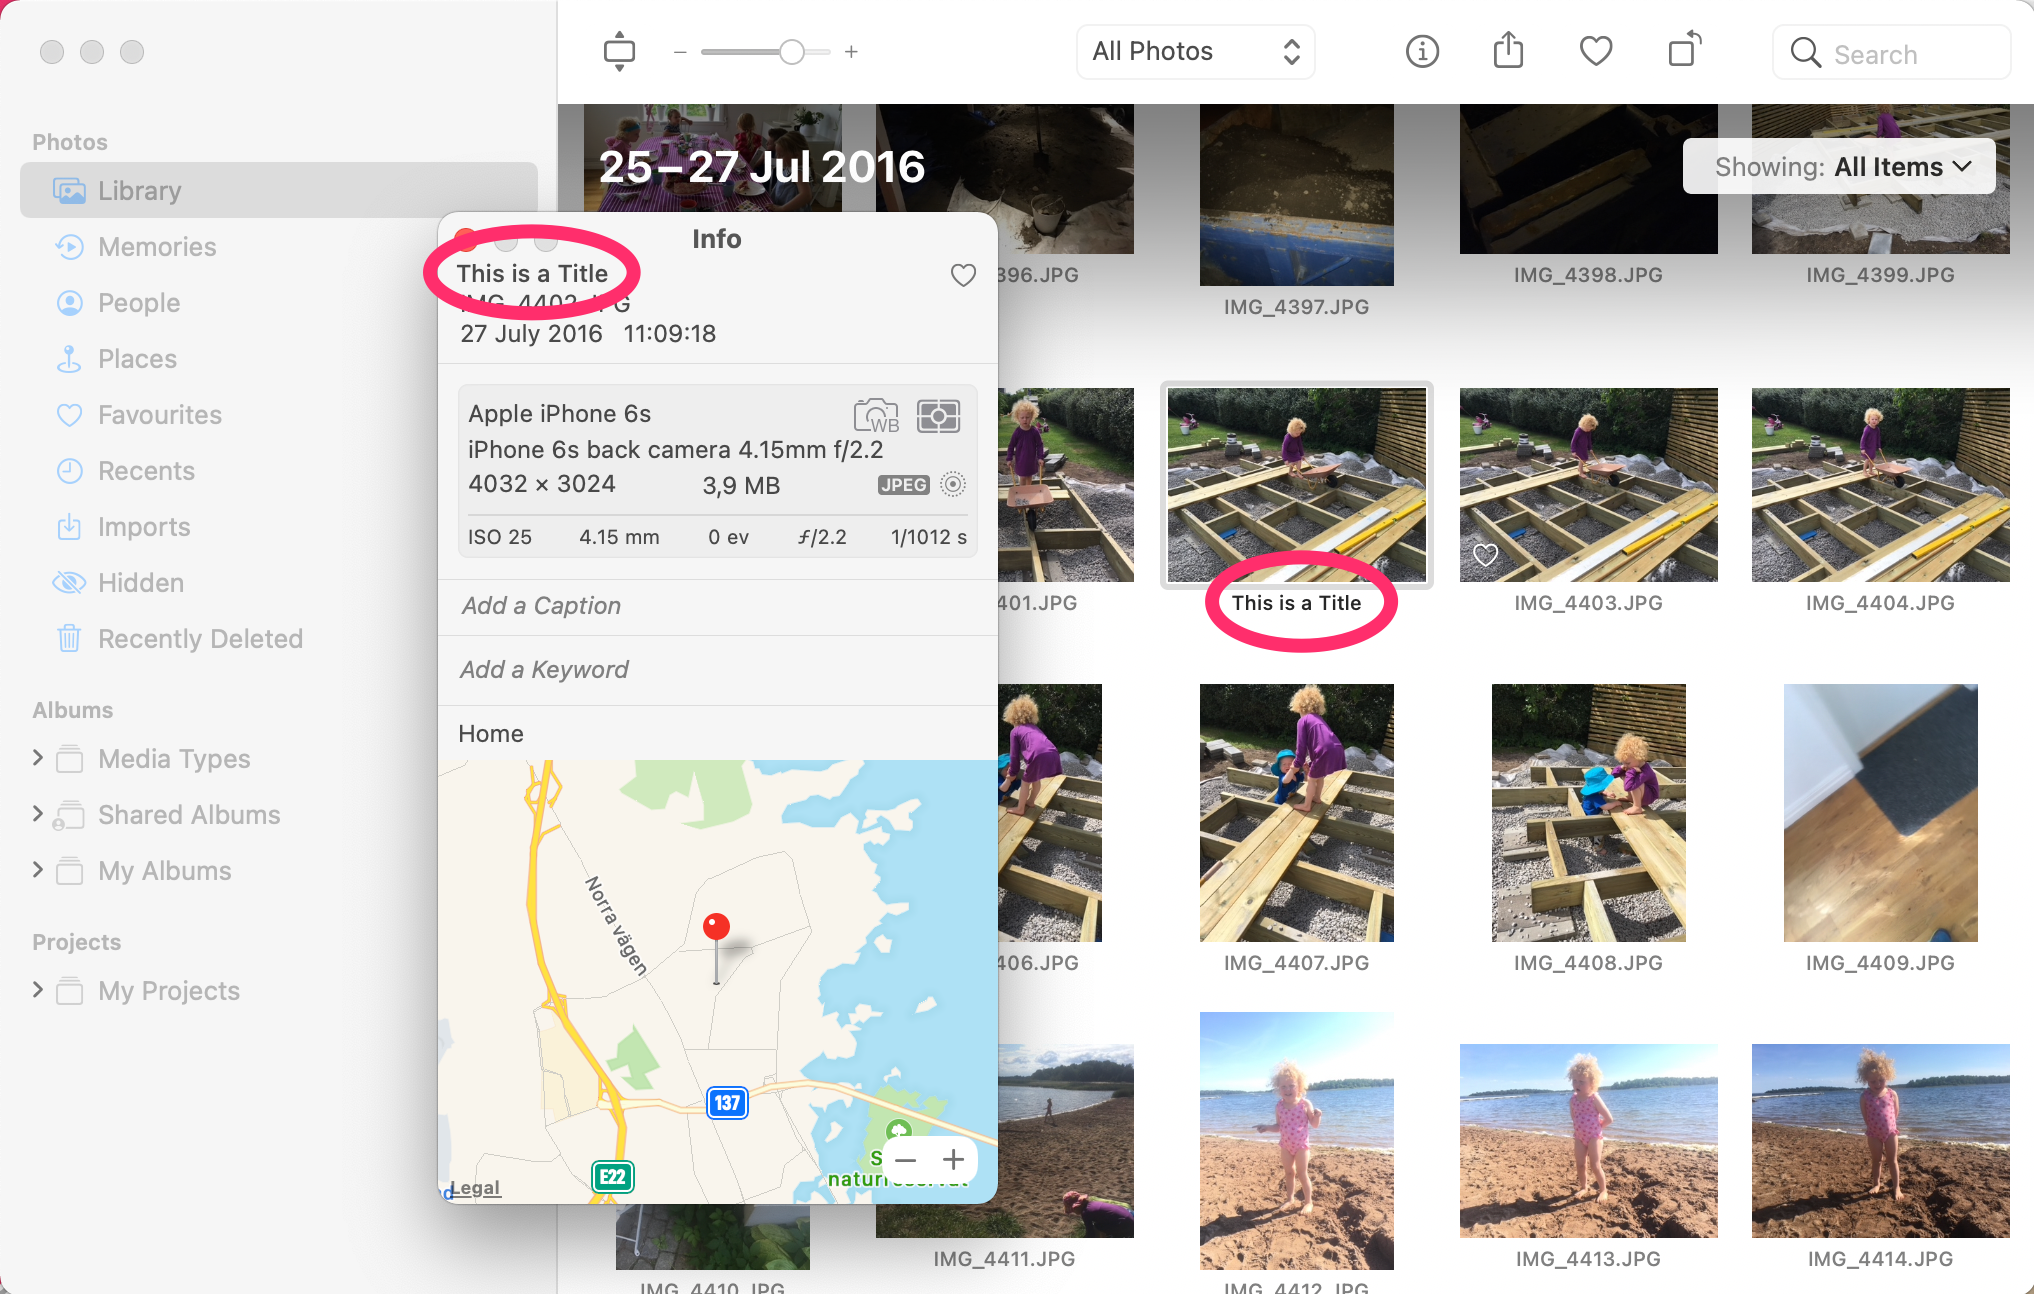
You can also batch change both the Title and the Caption by selecting many photos. If you want to batch erase the Title or Caption you need to take one extra step though. If the Title and/or Caption is not the same for the selected photos it will look like this:
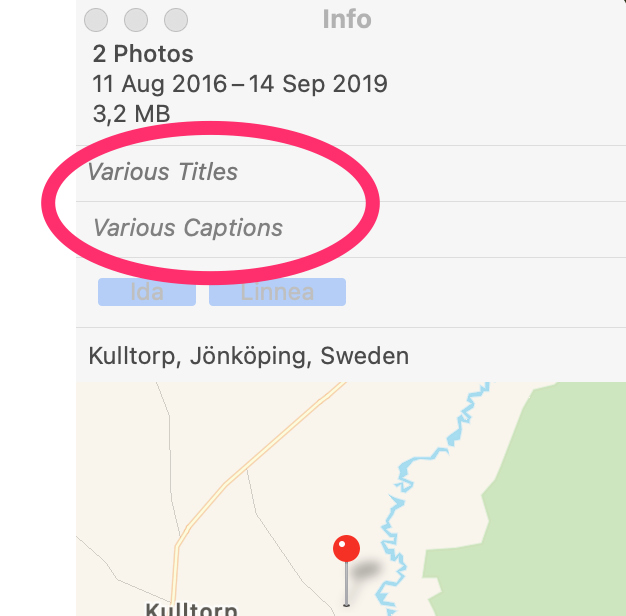
Those “Various” things can be set to something in common, but it can’t be directly erased! You will need to first set them to a common value, and then you can erase them.
Date and time
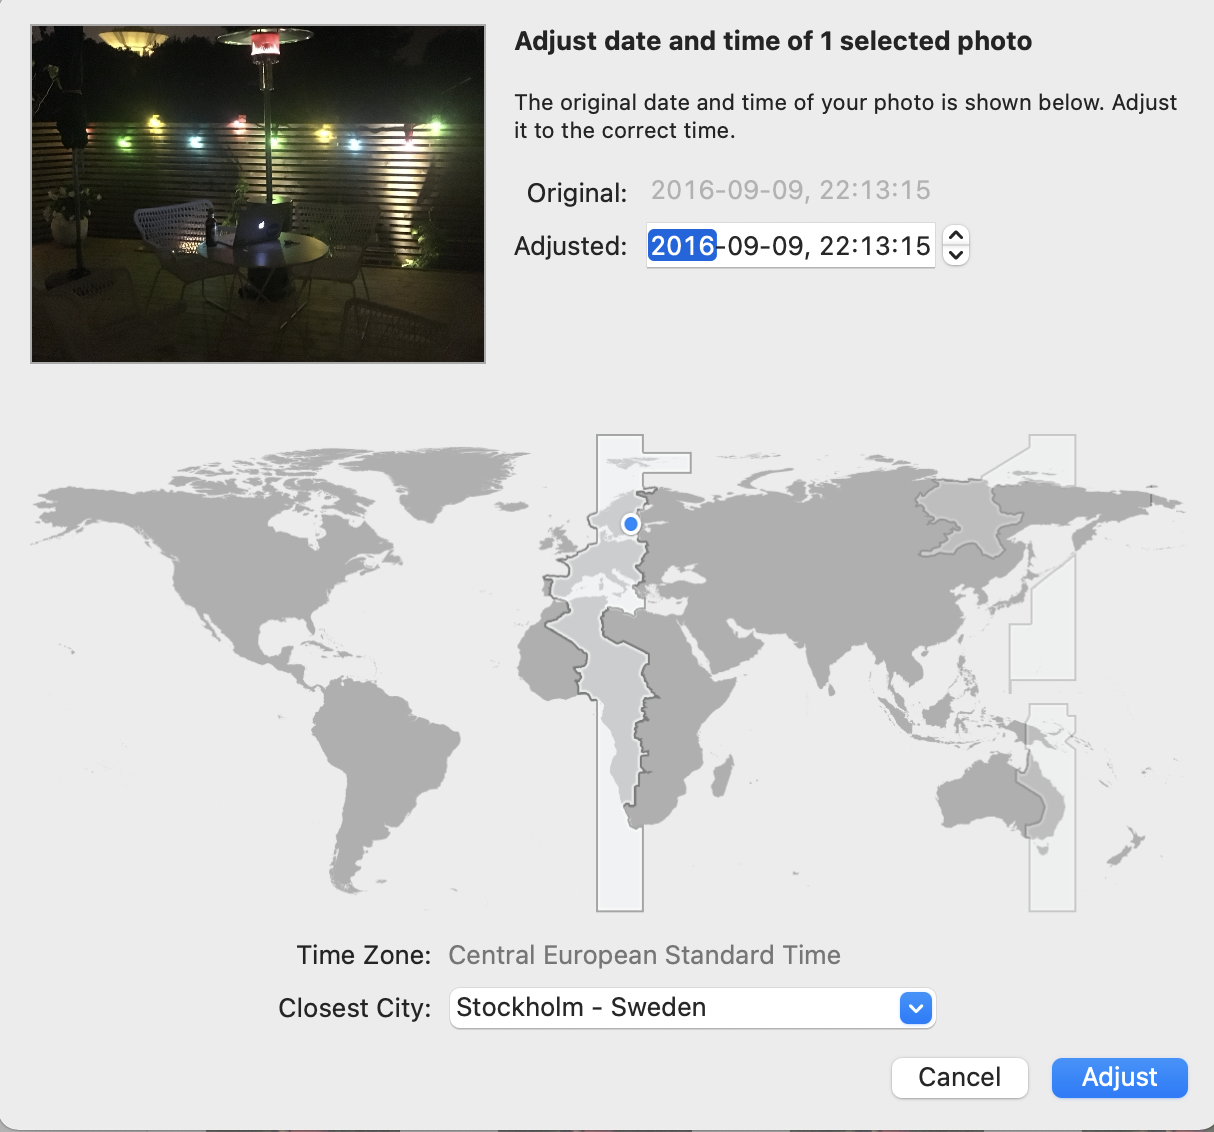
The date and time comes from the Exif date of your Photos. The Exif date is the date and time stored in the metadata data within your photos file when the photo is taken. It is not the same thing as the created date of the file. If the photo has been stripped of metadata (such as Exif or XMP) before importing it to Photos then Photos will use the creation date of the file.

If you have selected only one file, then you can double click on the date and time in the Info window, a new window will appear where you can modify both the time, date and time zone. You can also access this window from the menu Image→Adjust Date and Time…
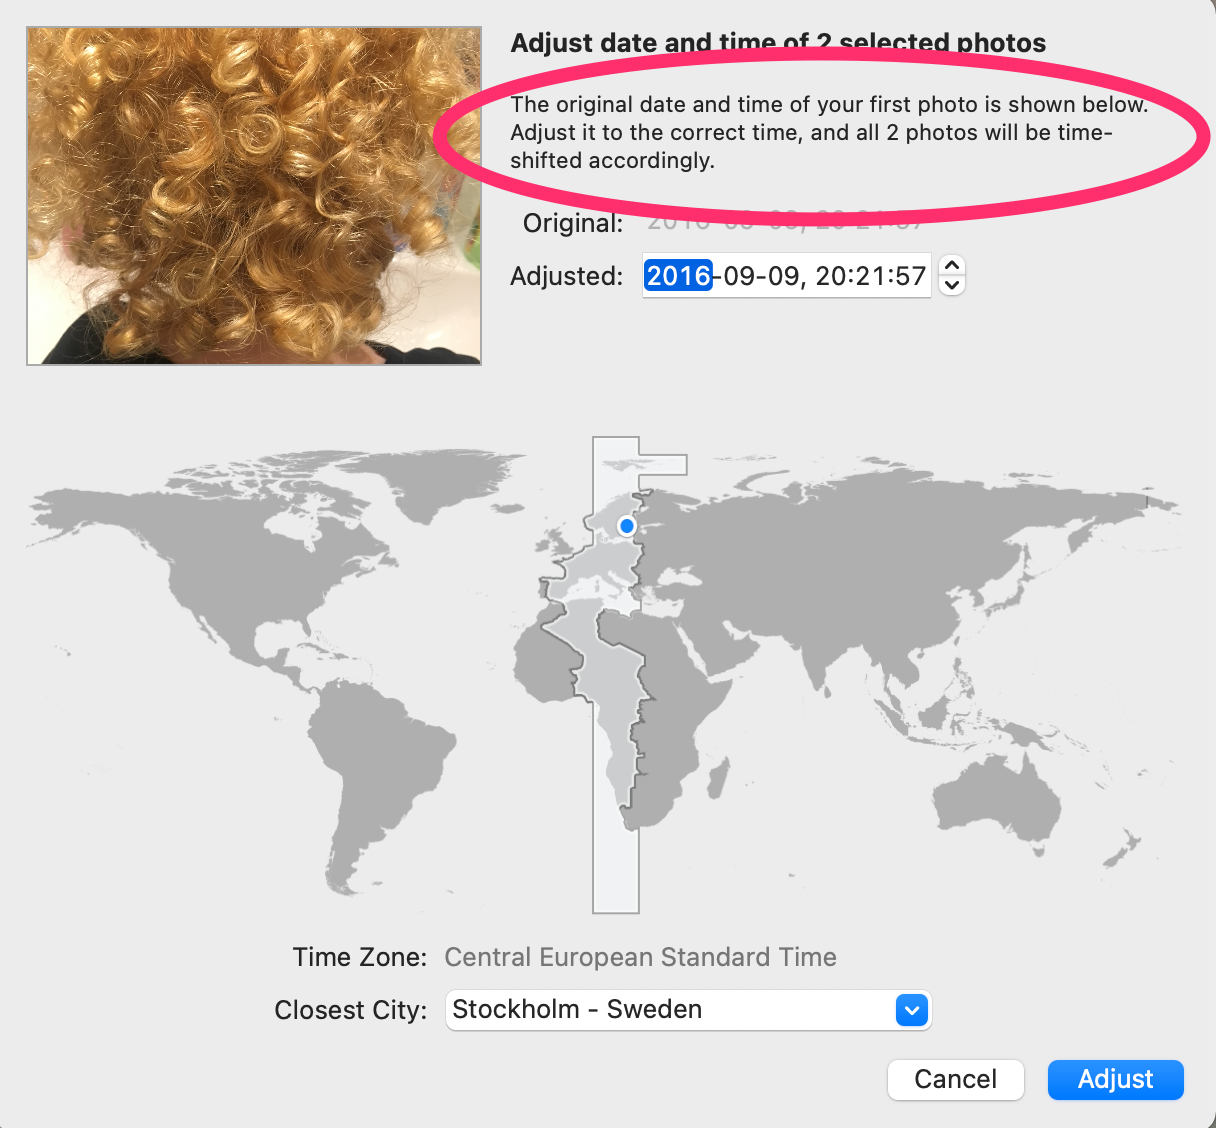
If you want to batch change the date and time of photos, then you can’t double click on the date in the Info window, instead you will have to go directly to the menu Image→Adjust Date and Time… When batch changing the date and time there is a difference though. You are not setting a specific date and time of the photos, you are time shifting the photos. A time shift means that you define the new date for the first photo in your selection. Photos then calculates the time difference between the original date and the new date, then applies the same amount of time shift to the dates of the rest of the selected photos.
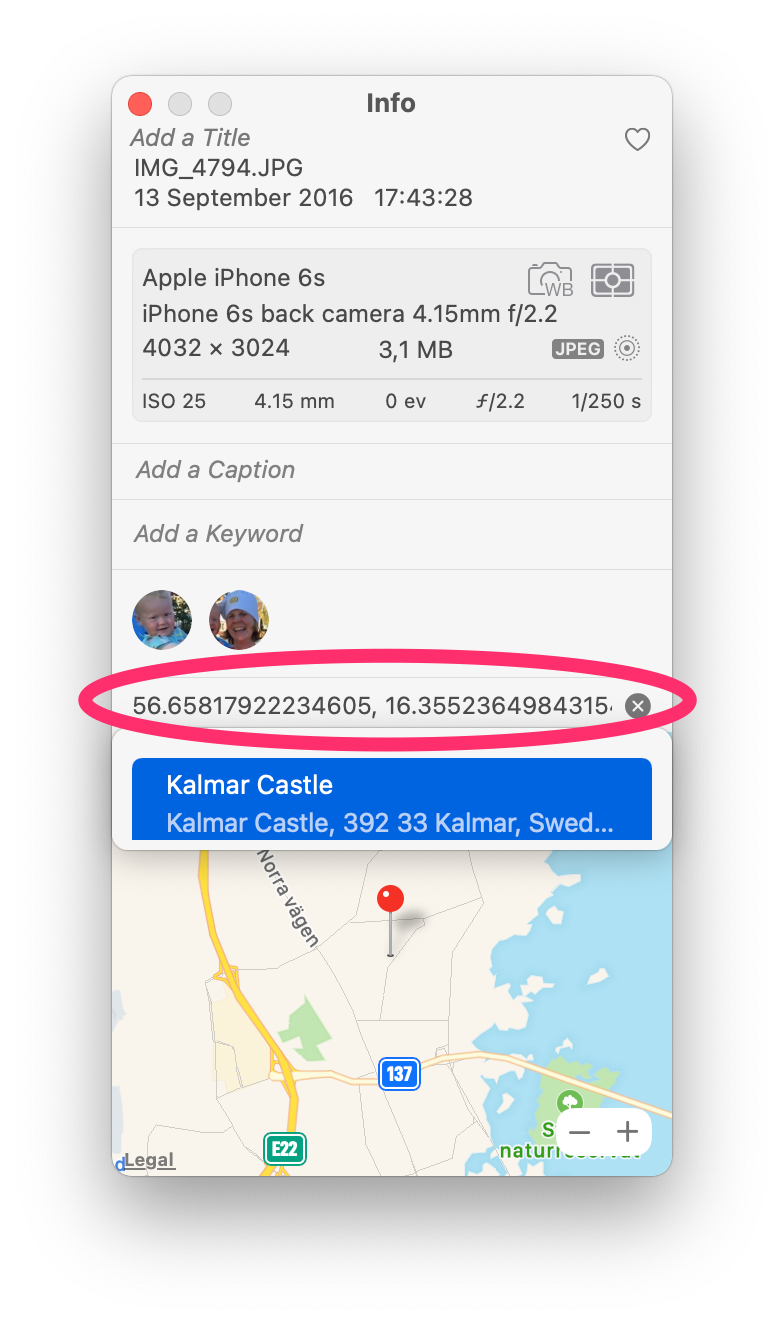
Geolocation
If your camera contains a GPS, which any smart phone does, then the photos metadata will also contain the exact position of where the photo was taken.

Here you can modify the place in a few ways. You can either grab that little red pin and actually drag it to the location where you want it to be. Or, you can use the address field just above it and type in the location (while you type you will get suggestions of what you might want).
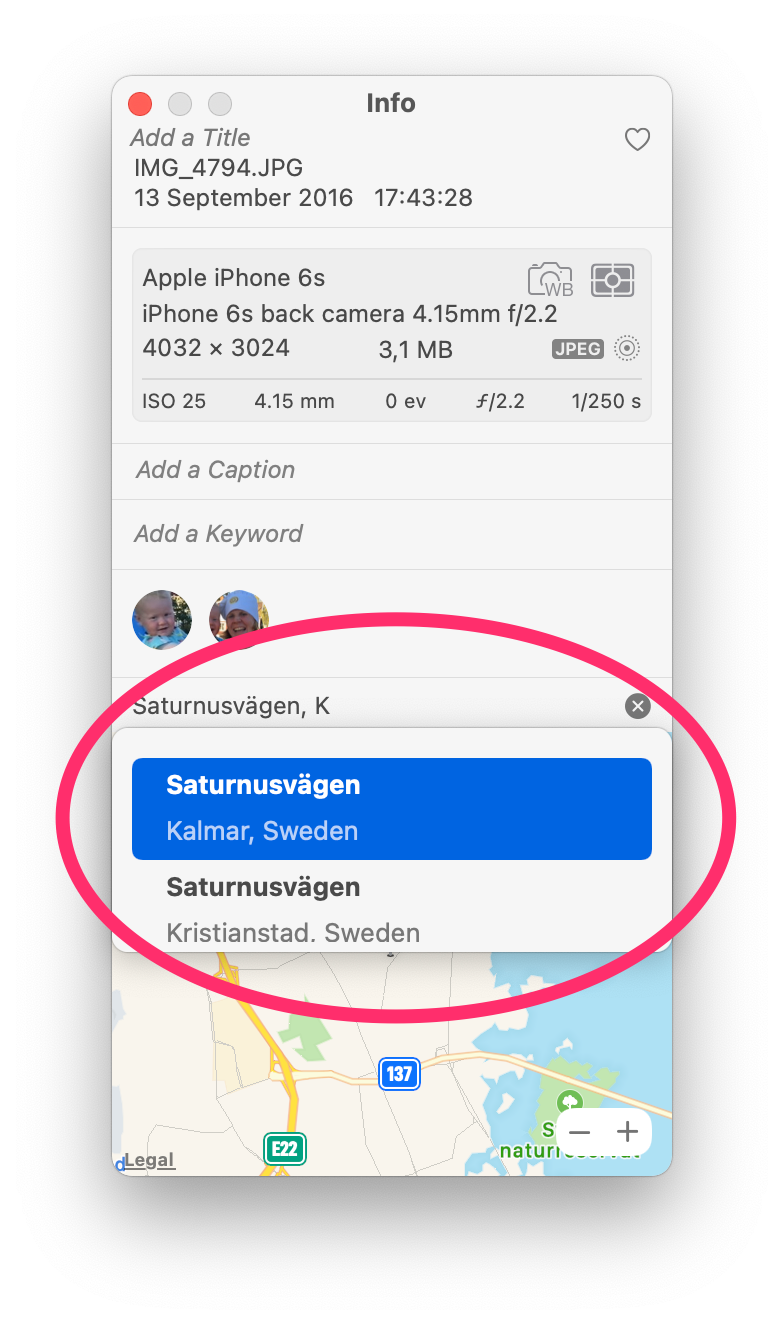
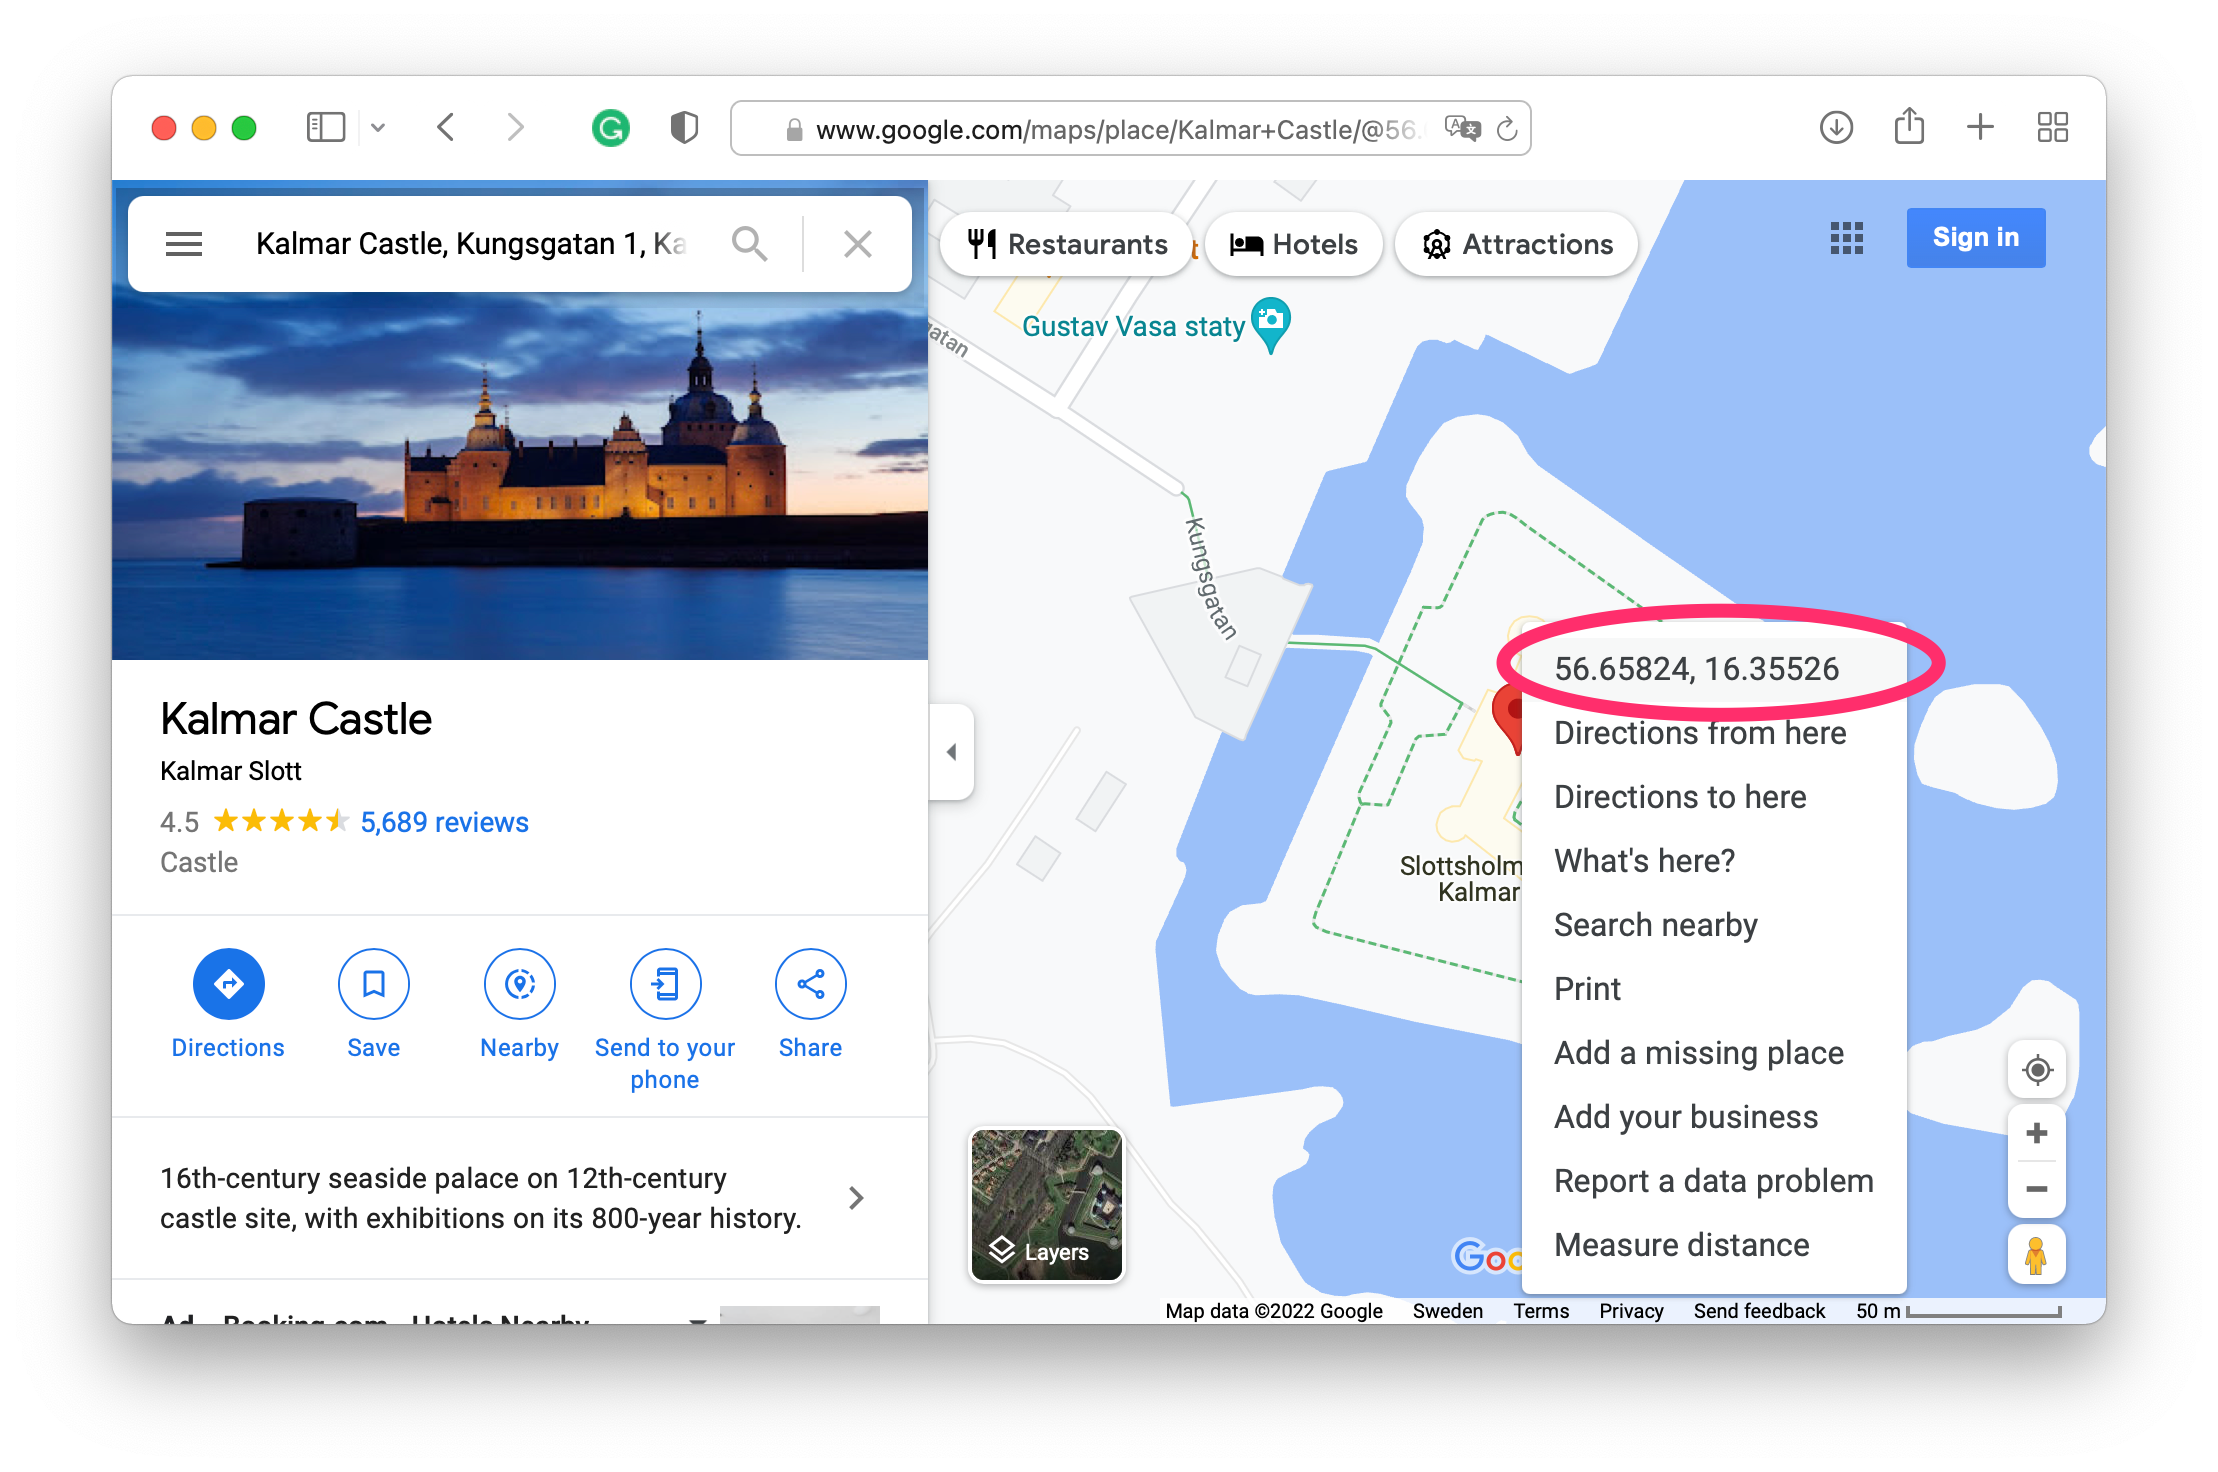
If you find it cumbersome to enter the exact address, or drag the pin to the right location, open up Google maps in a browser and navigate to the position you want and right click. A small menu will appear where the coordinates are shown. If you click on those coordinates they will be copied to your clipboard and you can paste them directly into the address field in the Info window in Photos.
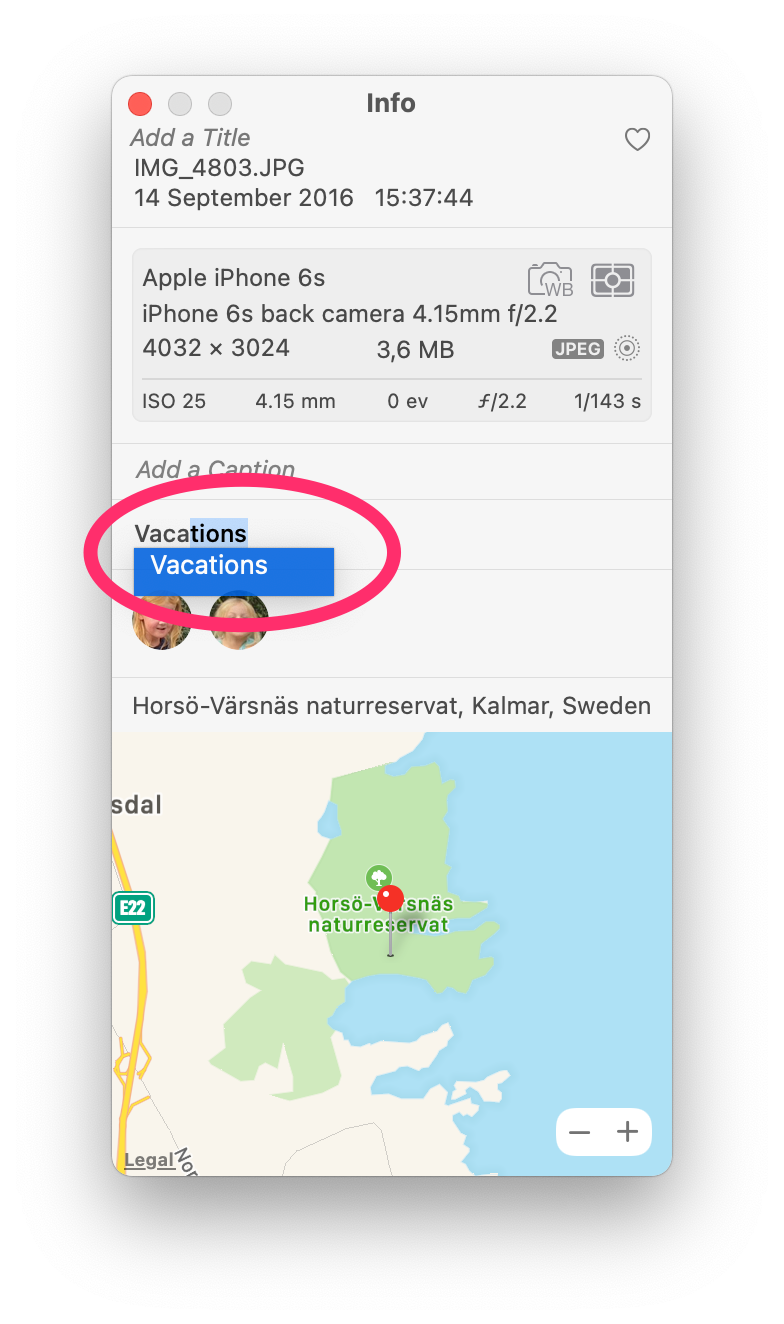
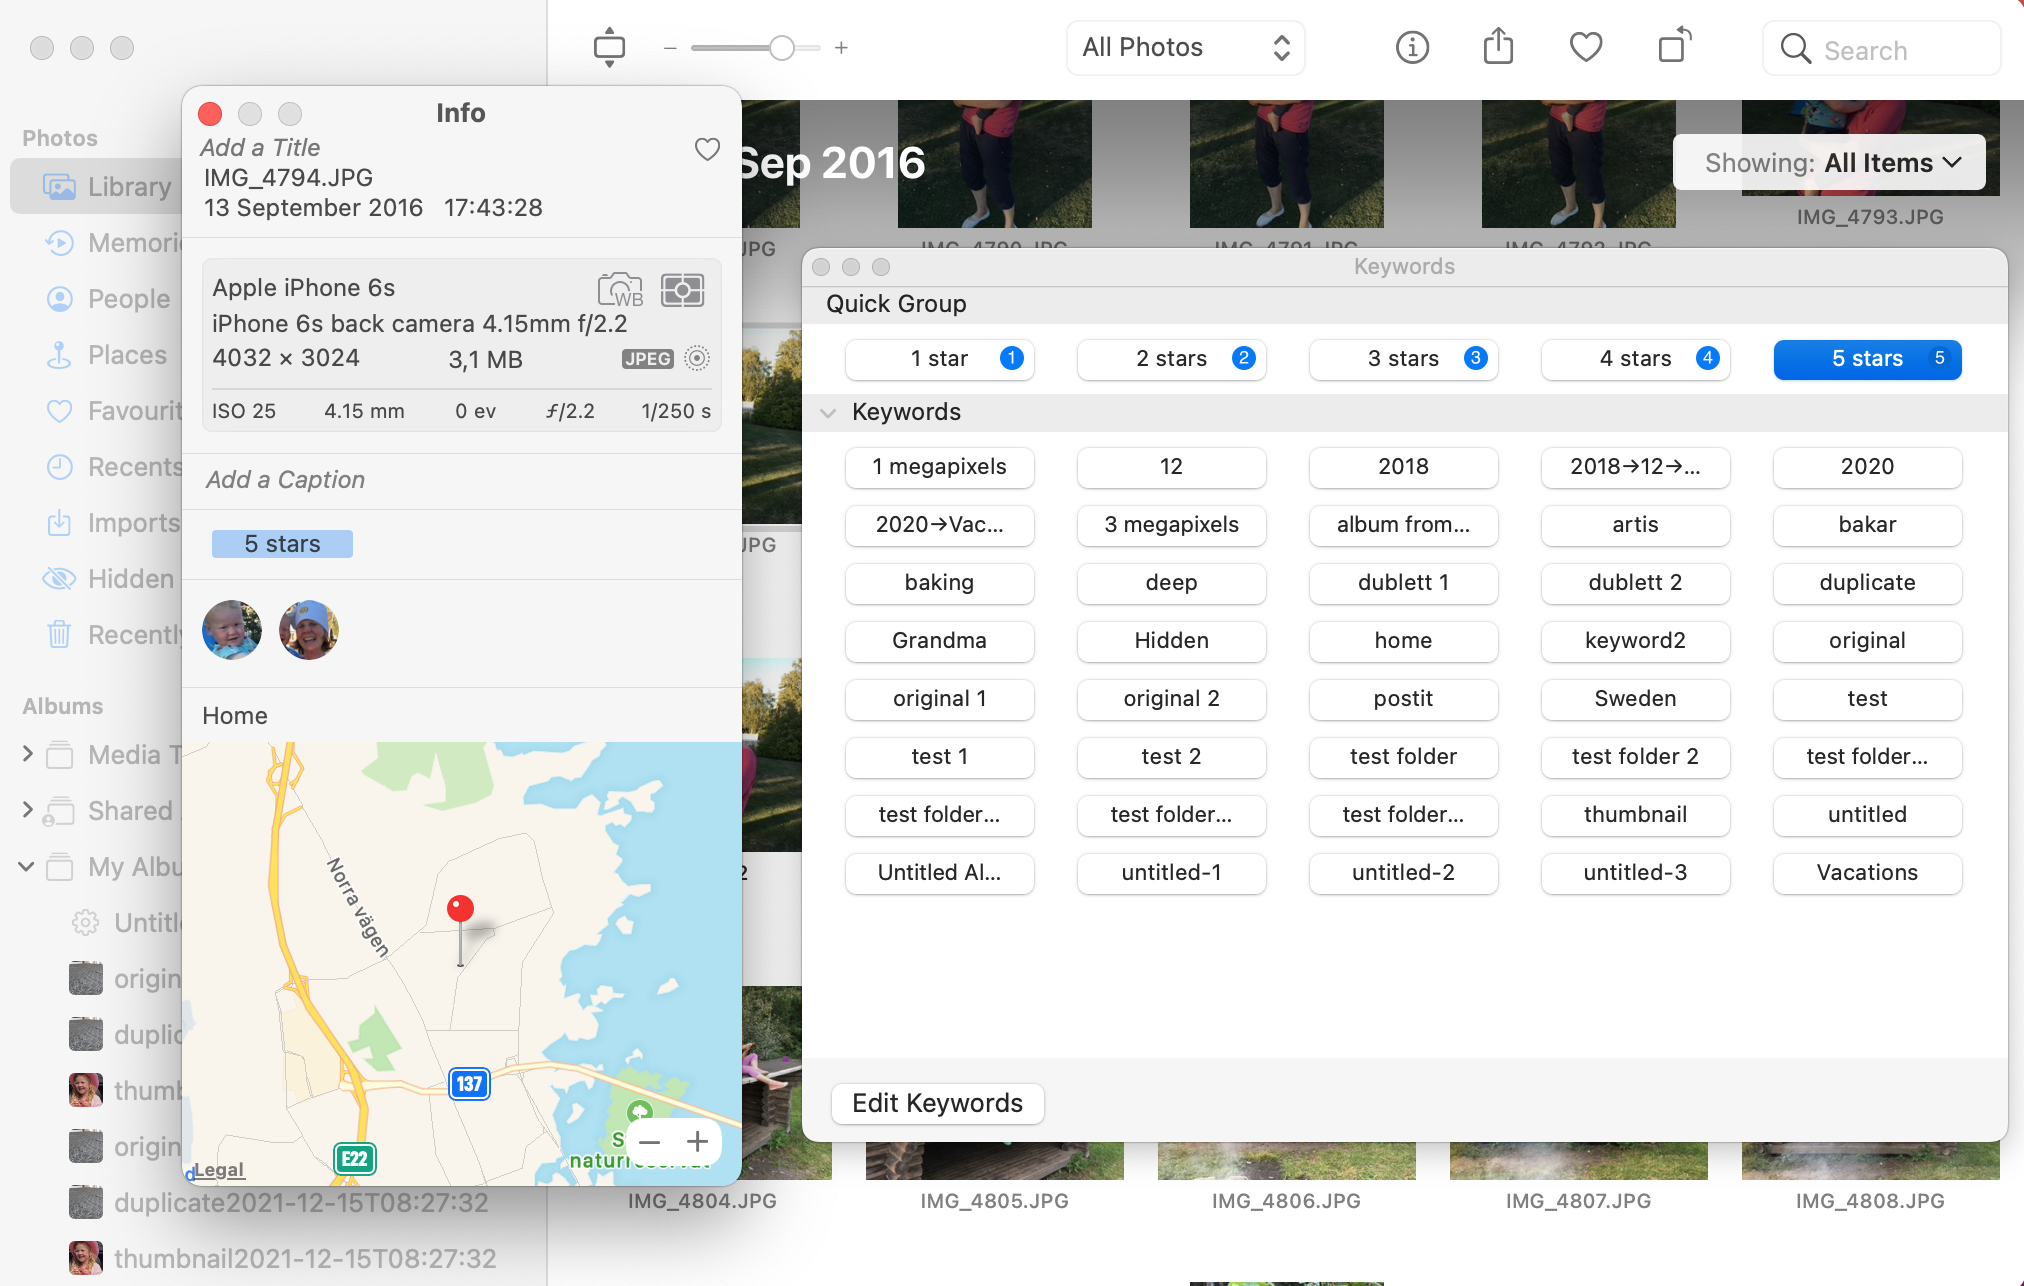
Keywords
Finally we have keywords, keywords are great for marking generic things which are not a description, location or date. Think of keywords as labels such as “vacation”, “work”, “school”, “family”, “5 star”. Anything goes, but based on experience it is usually a good idea to keep it simple! If it’s not simple, you will stop using the keywords since it gets too cumbersome and complex.
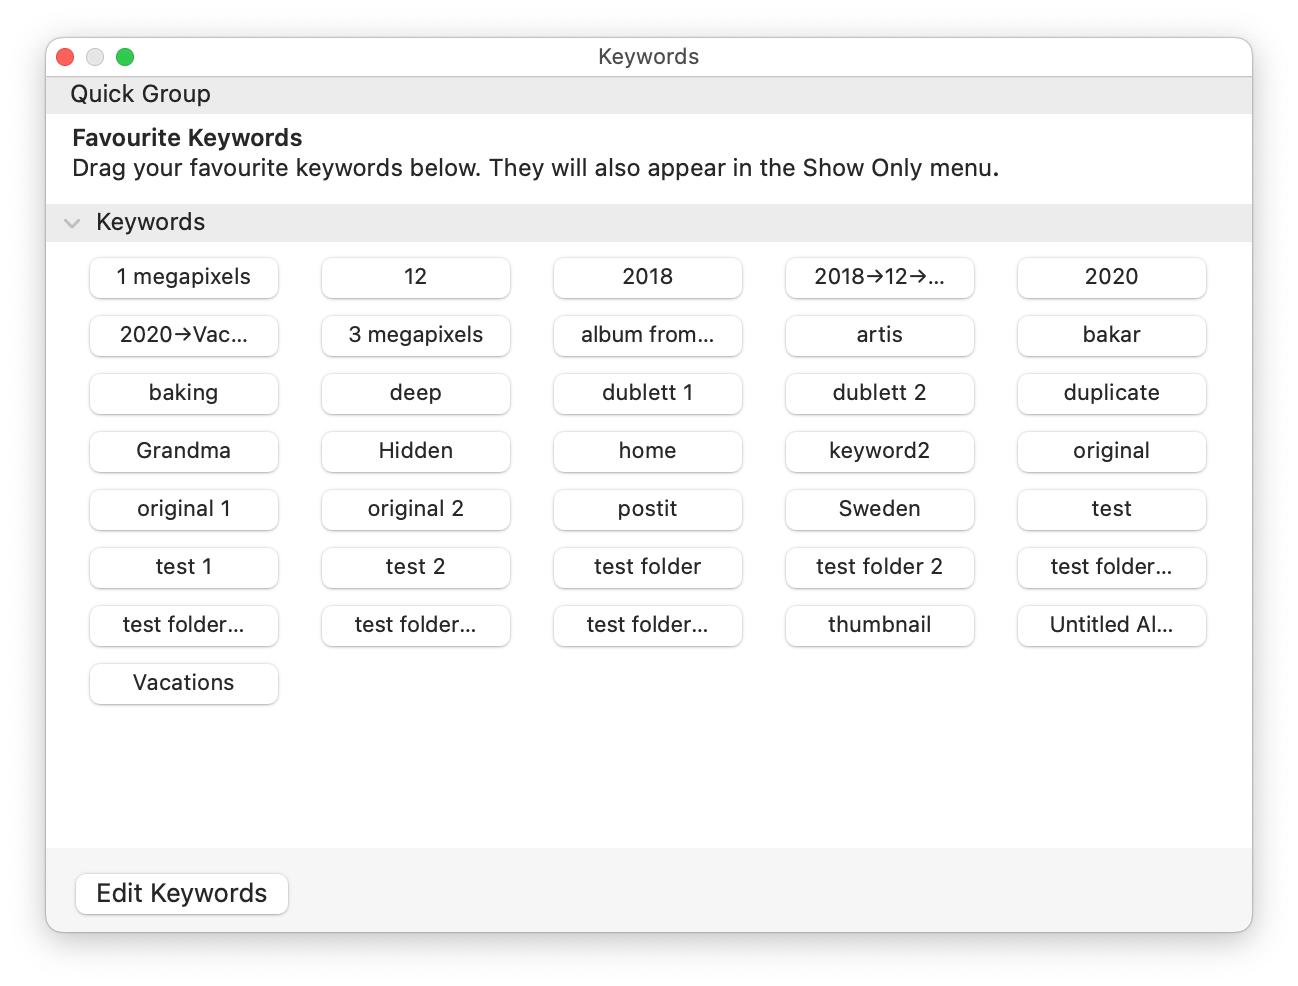
To add keywords you can either use the Keywords Manager window which you can access with Command+K or with the menu Window→Keyword manager or you can simply start entering keywords in the keyword field in the Info window, and Photos will give you suggestions based on previous keywords. If you enter a keyword that does not previously exist, then it will simply be created when you hit enter.
It is not unusual that the Keyword manager contains all kinds of strange keywords with unclear origin, either from previous attempts, imported photos, migrations from other applications such as iPhoto or Aperture and so on. So if you decide to start using Keywords it is usually good idea to start by cleaning that list.
And while you clean up that list why not consider a few keywords with shortcuts? A popular example is using keywords for ratings (1 through 5 star) which many used in iPhoto and Aperture and were replaced with the Favorite/Heart in Photos.
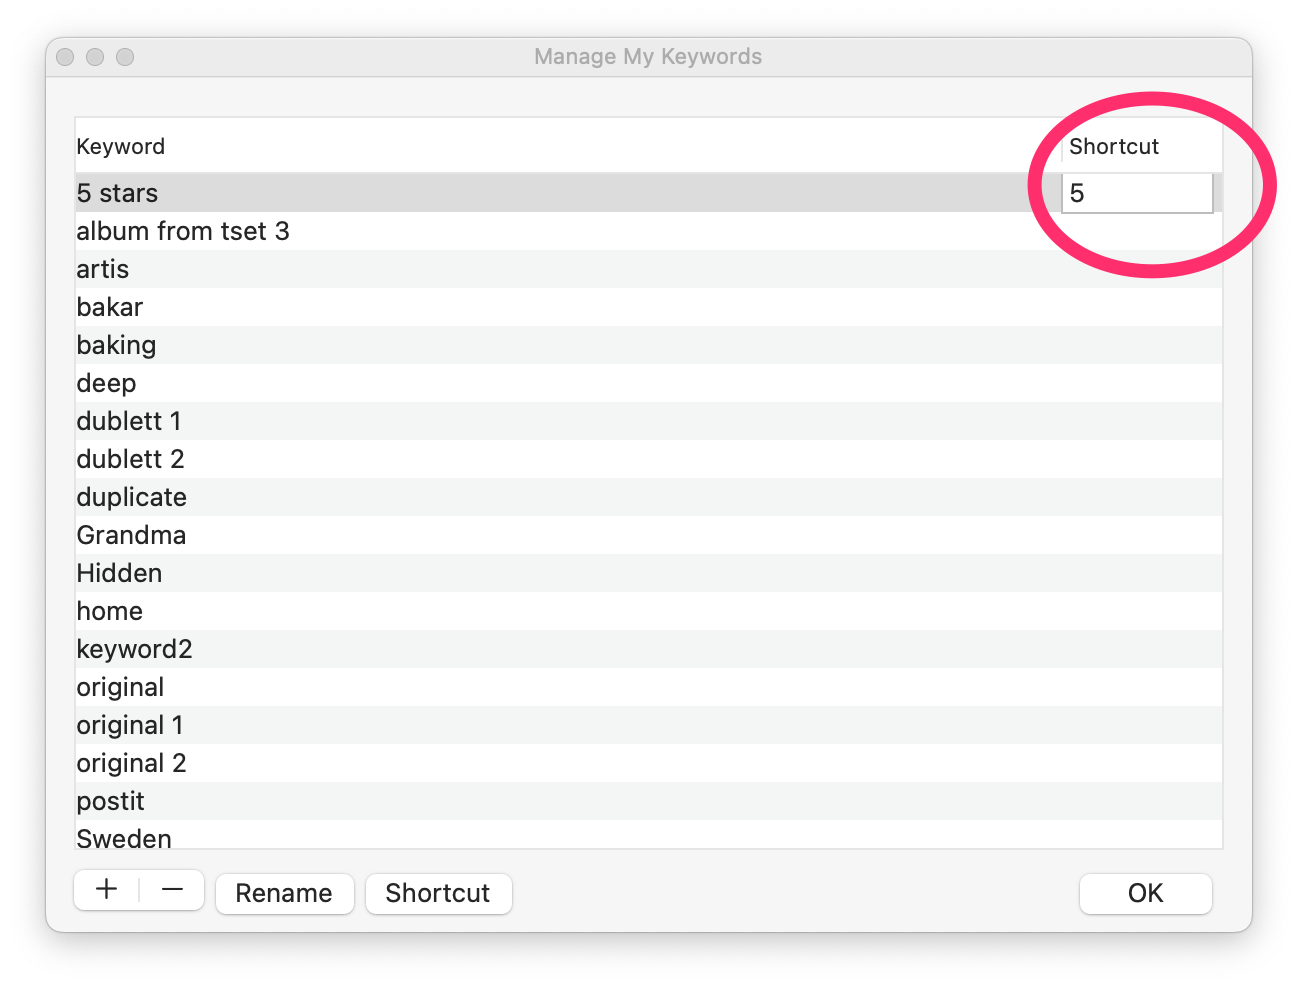
When you have assigned shortcuts you can assign keywords to photos by using that shortcut, but remember that it only works if the Keyword manager window is open.
Favorites
Finally let’s mention the Favorite mark which is visualized with a small heart symbol in Photos. It can be applied in many ways. First, we have it in the Info window where you can apply it to one photo at a time. Secondly, we have it in the photos browser where you can apply it by clicking on the heart symbol when when you hoover the mouse pointer of an image. You can also apply the heart by using the heart icon at the top right of the applications window, the menu item Image→Add to favorites or with the keyboard key “.”.
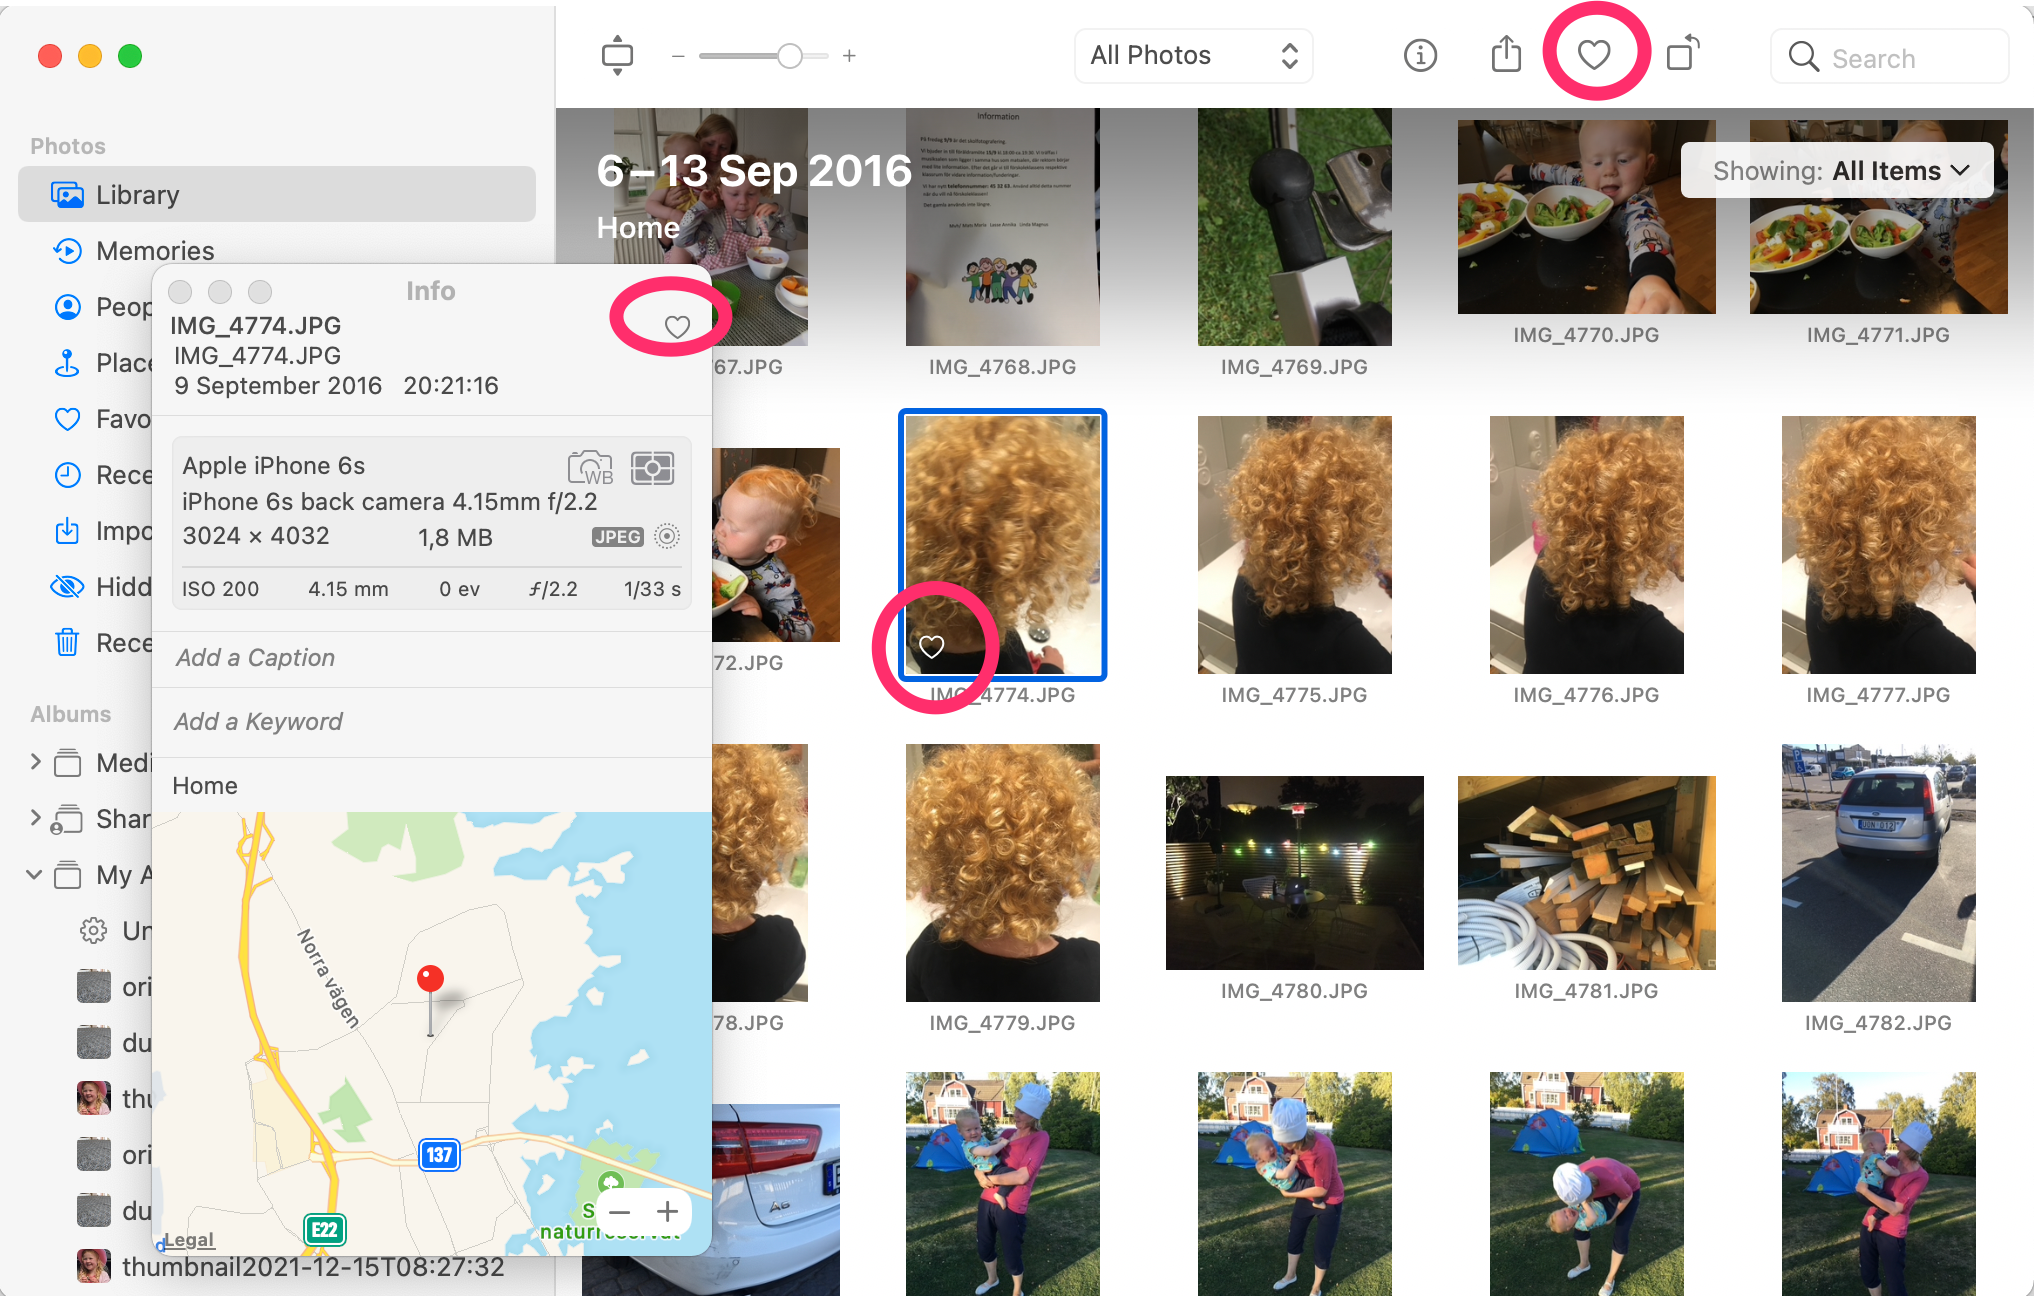
The last three methods also work when you want to mark a batch of photos. Use the same methods to un-heart. Now, the question is: what happens if you have selected a few photos which have been marked and haven’t been marked as Favorites? Well, if you mark them as a favorite using any of the last three methods, it will mark them all as favorites whatever the status was before.
1 on 1 training sessions
It is indeed great fun to meet you guys in my 1 on 1 training sessions. If you haven’t tried, it but feel that it might be something for you, please feel free to email me. The training sessions can be about anything and will be customized based on your requests. I have over 25 years of experience in the Mac platform, I have been an Apple Solution Expert and have held training in various software over the years. Training sessions are on request by contacting me at training@brattoo.com. Each session is 1 hour and costs 79 USD. If you want to learn more about something, email me at training@brattoo.com and we’ll work out a session just for you.
The free apps section
As I have mentioned in previous letters we have received requests on how to automate some tasks in Apple Photos or tasks related to photos. Those tasks might be tedious to work out manually but are easy for us to solve. The apps include a tool to set the Photos Titles based on the filename (with or without file extension), a tool to copy and apply GPS coordinates between photos, a tool to copy XMP sidecars to image files and finally a utility to set the correct file dates on image files based on the photo date stored in the metadata within the image files. You’ll find all our free apps at https://free.brattoo.com.
This newsletter and previous letters
Several of our readers have requested that we resend previous emails so that they could catch up on earlier tips and information. All previous emails are available online in our Newsletter section at https://newsletter.brattoo.com
License upgrade - final call?
It was supposed to be the final call for discounted upgrades and we did discontinue it for a short period but received so many requests so we decided to open it up again. After all, we do try to be nice guys.
For only $4.95 you can upgrade any old Duplicate Annihilator license to Duplicate Annihilator for Photos and for just three dollars($3.00) more you can upgrade any old Duplicate Annihilator license to the Duplicate Annihilator Toolbox including a family pack! This means that you get five licenses for you and your family for all versions of Duplicate Annihilator including iPhoto, Aperture, iOS and Photos for only $7.95.
Get the upgrade from: https://upgrade.brattoo.com
Support the creation of these newsletters by becoming a Patreon!
If you enjoy these newsletters and want to support the creation of them, then please consider becoming a monthly contributor by signing up to become a Patreon at https://www.patreon.com/brattoo. Patreons gets access to videos of hints and tips from my newsletters.
Thank you for your time, I hope that you found this email informative. If you have any feedback, suggestions, questions or ideas then please reply to this email. I read all emails and reply to them in person. And, don't forget to stay safe.
Best Regards,
Anders, CEO and Founder, Brattoo Propaganda Software
Duplicate Annihilator
Duplicate Annihilator is one of the oldest and most competent duplicate detection softwares for photos on the market. It's available for Photos, iPhoto, Aperture and iOS.
Photos Finder

Are your photos scattered everywhere and getting them into one Photos Library might seem like an impossible task. Photos Finder makes this task as simple as the click of a button.
Free software

They say there is no such thing as a free lunch but we have free apps. Built for our customers, based on personal requests and completely free of charge. Bon appétit!
Support

Sometimes everything seems to complex and daunting but everyone needs a little help now and then or at least a nudge in the right direction to get back on track. This is where you find it.
- © Untitled
- Design: HTML5 UP